


What to Expect After Surgery?
- Preparing for your Clinic Visit
- Preparing for your Surgery Day
- Procedures
- What to Expect After Surgery
- Follow Up Appointments
- Support Numbers
PREVENTING POSSIBLE COMPLICATIONS OF SURGERY
The complication rate after surgery is low. While uncommon, all surgical patients are at risk of complications. Please follow the post-operative instructions and protocols carefully.
CARE OF YOUR INCISIONS
- There may be mild to moderate bleeding or drainage at incision sites which should stop after the first few days.
- Leave the surgical dressings in place for 5 days (Unless specifically told by your surgical team to leave dressings in place. If you are unsure, call your surgical team).
- After 5 days, the dressings may be removed and replaced with water-proof bandages or smaller dressings.
- Be sure to leave any small tape strips (SteriStrips) that may be covering your incision sites.
- Do not touch or pick at the sutures and incision. Do not place lotions or ointments over the incision sites.
- Inspect the wounds at time of dressing changes for signs of infection. This includes increased redness, tenderness, swelling, and pus drainage. If you notice any of these signs around the incision sites please notify a member of your care team immediately.
- You have absorbable stitches that do not need to be removed. You can have a “tail” or a knot that pops through the skin. If this happens, please let one of team members know.
SIGNS OF INFECTION
- It is common to experience a mild fever during the first few days after surgery along with nausea, light-headedness and dizziness from anesthesia or narcotic medications. Drinking fluids, deep breathing exercises and getting up and moving around should help. These symptoms should typically improve in 2-5 days.
- An antibiotic is typically given right before your surgery to prevent infection. For most surgeries, it is not necessary to treat with antibiotics after the surgery.
- Good hygiene is important to preventing infections.
- Some signs and symptoms of infection include: High fever, redness around wound, pus draining from wound, night sweats or chills, or severe tenderness around incision site.
SHOWERING
- You may shower when you feel that you are able to. NO BATHING for at least 3 weeks.
- Keep your incisions clean and dry. Try these methods to help dressing dry.
- Cover your incisions with waterproof bandages for showering.
- Use a shower head in order to keep water away from your incisions.
- Fill a basin with mild soapy water and sponge bathe if needed. You may place a chair in your shower or take sponge baths to minimize pain or if you are uncomfortable standing in the shower after surgery.
- Do not use any ointments, baby powder or lotions until your wounds are fully healed.
- Do not use antibiotic ointments or hydrogen peroxide on your incisions.
- Avoid touching your incisions and picking at your sutures.
- Do not get your incision dirty.
You will not be allowed to soak in a hot tub, pool, creek, lake, river or ocean for a total of 3-4 weeks until the incision sites are COMPLETELY healed.
BLOOD CLOTS
Blood clots, also called deep vein thrombosis (DVT), can result from multiple factors after surgery. A primary cause of DVT is not getting up and moving around after surgery. Various measures that can be used to reduce the possibility of blood clots include special anti-embolism stockings (TED hose), blood-thinning medications, inflatable coverings, ankle pumps and other exercises, and routine walking.
When sedentary, please move your ankle up and down throughout the day to help blood flow and decrease the chance of a blood clot.
Please let a member of the care team know immediately if you experience:
- Large amounts of swelling in an extremity.
- Cramps in your calf or lower leg
- Sharp/sudden chest pain
- Difficulty breathing, shortness of breath
All of which are some signs and symptoms of a DVT or pulmonary embolism (PE).
If you have a history of previous blood clots, please remember to inform your care team about this information before and on the day of your surgery.
NUMBNESS
Patchy skin numbness is relatively common after a surgery. This feeling typically resolves within a few months. With some surgeries, there may be some permanent numbness but usually does not interfere with quality of life.
PAIN MEDICATION
- You will be given a prescription for pain medication. Take your medication with food and only as directed on the label.
- DO NOT mix pain medications with alcohol.
- DO NOT drive while taking narcotic pain medications. These will impair your ability to drive.
- You may reduce your use of narcotic pain mediation as soon as your pain allows. Substitute non-narcotic pain medications such as Tylenol (Acetaminophen) when possible and if tolerated. You may have been given a prescription for an anti-inflammatory (naproxen, ibuprofen, meloxicam, etc). This is also a non-narcotic pain medication.
- Ice and rest can help manage the pain as a substitute for medication.
- Our goal is have you off narcotic pain medication within 2 weeks. We will work with you to wean you off of these medications. You may have to meet with your pain physician prior to surgery if you are currently on narcotic medication to discuss post-operative care.
- Narcotic medication is reasonable for short-term use after surgery. The goal of pain medication use after surgery is not to be pain-free, we expect some discomfort with surgery. Narcotics are addictive and have many side effects including respiratory depression, mood changes, hormonal imbalance, nausea, constipation, and pain amplification. To understand the opioid epidemic, please refer to the Center for Diseases Control (CDC) website.
Prescription Requests and Refills
- Allow 24 hours for a refill or prescription request
- Please call us before you run out of your medication.
- Please be aware that it is best to call Monday – Thursday, in the event that you may run out of pain medications over the weekend.
- If you are out of town, please allow for enough time for the prescription to be mailed (5-7 days) or arrange for a local physician to provide refills.
CONSTIPATION
You may have constipation after surgery, particularly with the use of narcotic medication:
To avoid constipation:
- Drink a lot of water (64 ounces per day minimum).
- Increase fiber intake by eating dried fresh fruit, whole grains, vegetables, bran, psyllium, apple juice and prune juice.
- Use stool softeners.
- Decrease or stop narcotic pain medications as soon as possible.
You should not go more than 3 days without a bowel movement, including days you may have spent in the hospital. Call your doctor if you have any issues with bowel movements.
SLEEP
Getting back to a normal sleep pattern can be difficult. If you have trouble, avoid taking an afternoon nap. If pain is preventing sleep, schedule your pain medication so you can take 1-2 pain pills one hour before bed. Elevate your leg and apply ice in the early evening to help control pain.
DRIVING
Driving after surgery is done at your own risk and you assume all liability when doing so. You must be off all of your narcotic medications. You must feel like you can operate a vehicle safely to avoid harm to yourself and others. It can be helpful to sit in the driver’s seat and go back and forth between the brake and gas to assure that your reaction time is normal. Be a cautious driver. If an accident were to occur, you could be blamed for your recent surgery. Practice driving in a large parking lot before proceeding to the road.
RETURN TO WORK
Most people return to work 1-6 weeks after surgery depending on the demands of their job and also depending on the procedure. Desk jobs may be resumed quickly, while heavy labor jobs generally are not resumed 6-8+ weeks following surgery. You may request to be released any time you feel ready to return to your job, but should not return to full duty without physician clearance.
ICE USE
Swelling and bruising in your surgical site is normal and should decrease with time. Ice the area several times a day for about 30 minutes. This will help pain control. Heat is not recommended as it can increase swelling. You may use ice bags or ice packs over the hip to help with pain.
You may have been given an ice machine. The care team will show you how to use this machine prior to your discharge.
CPM USE
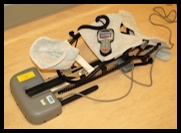
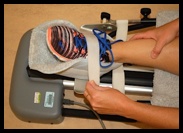
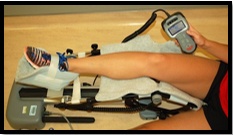
Depending on your surgeon/procedure you might be given a CPM (continuous passive motion) machine to use after surgery. These are covered by insurance companies about 90% of the time. If your insurance does not cover this machine, you may be billed about $120.00 to use this machine for 21 days.
A CPM is used to help maintain motion. You should use the CPM multiple times throughout the day, increasing the flexion/bend by a few degrees daily as you are able to tolerate. This should not be torture.
WEIGHT-BEARING
The amount of weight that your surgeon allows you to place on your leg after surgery is dependent on your surgery.
Below are common weight bearing precautions that your surgeon may ask you to follow:
Non-weight bearing: Do not apply any weight through the involved leg.
Touch Down Weight Bearing: The touch down method means you may touch your operated leg on the floor, but do not put full weight through the extremity. It is as if you are “walking on eggshells.” Allow only the ball of the foot to touch the floor for balance purposes.
Partial Weight Bearing: Partial weight bearing means you may place up to 50 percent of your body weight on your operated leg. Do not place full weight on the operated leg until cleared by the doctor.
Weight Bearing as Tolerated/Full Weight Bearing: You may place as much weight on your operated leg as you can tolerate. Use the crutches as needed to improve balance and safety while your leg is painful.
CRUTCH USE
Some procedures require the use of crutches. Whether or not you need crutches and how long you are required to use them depends upon the surgery performed and your surgeon’s recommendations. Your crutch use will be detailed out for you at discharge and during your post-operative clinic visits.
If you do require crutches we would like to give you some tips on how to use them.
CRUTCH TIPS AND SAFETY:
BE SURE TO KEEP WEIGHT BEARING RESTRICTIONS ON THE STAIRS.
- When using crutches, be sure to place weight through hands. Do not place weight on your armpits as nerve damage can occur
- Squeeze crutches between your arms and chest wall if you are just standing.
- Do not use crutches if you are feeling light-headed or dizzy. Ask for help or wait until dizziness goes away. Be aware of the walking surface (i.e. indoors/outdoors). Keep your head up and look ahead.
Do not look at your feet while walking. Remove all throw rugs from the floor to prevent slips and falls.
You must pick up your crutches and injured leg higher while walking on carpet than tile or linoleum floors.
Take your time and do not try to walk too fast
CRUTCH FITTING INSTRUCTIONS:
- Proper fit should allow for 2-3 finger spaces between armpit and axillary pad. There should be a slight bend in your elbow when holding onto the crutches (15-20 degrees).
- You do not want your armpits resting on the axillary pads or your elbows locked out.
- The tips of your crutches should be 2 to 3 inches away from the side of your feet so you do not trip on them.
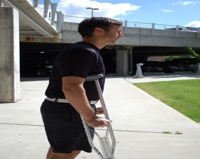
USE OF CRUTCHES:
ON LEVEL SURFACES:
- Crutch tips should be approximately 6" in front and 6" to the side of both legs.
- Advance both crutches, then the involved leg followed by the uninvolved leg.
- Continue this sequence applying proper weight bearing precautions.


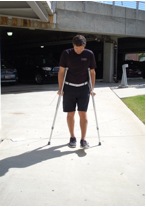
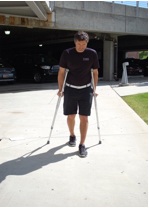
*In the pictures above, the right leg is the surgical leg. Weight bear as tolerated.
ON STAIRS/CURBS:
Going Up
- Place one crutch under each arm
- Keep the crutches on the stair you are standing on
- Support your weight between both crutches
- Bring your good leg up to the next step. Let your injured leg tail behind.
- Straighten your good leg and bring the crutches and injured leg up.
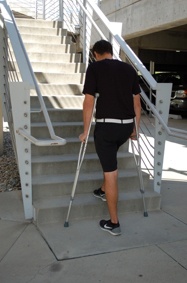
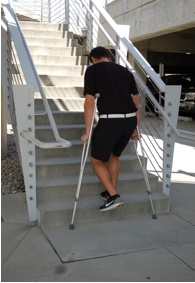
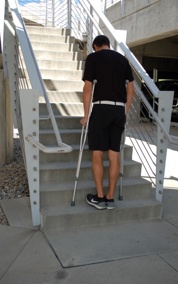
*In the pictures above, the left leg is the surgical leg
Going Down
- Place one crutch under each arm
- Put crutches on the lower step
- Support your weight between both crutches
- Bring injured leg down to the lower step. Let your good leg trail behind.
- Bring your good leg down.
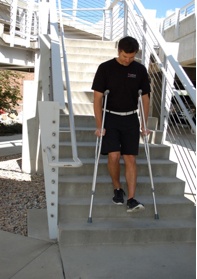
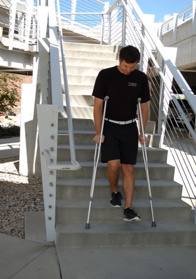
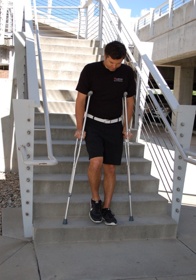
*In the pictures above, the left leg is the surgical leg
PHYSICAL THERAPY
For most surgeries, your surgeon will have you begin physical therapy at 2 weeks after surgery. Specifics regarding physical therapy will be reviewed at your post-operative visit in clinic.
Before surgery, find a physical therapy facility that you would be comfortable attending and one that your insurance will cover.
IMPORTANT PRECAUTIONS AFTER SURGERY
- Take medications only as prescribed.
- Keep your incision(s) clean, covered and dry.
- When lying in bed the first week after surgery, elevate your operative leg higher than your heart.
- Walk with weight bearing limitations that your doctor has requested.
- Use any equipment that has been provided for you.
- Do not overuse your surgical limb – this may result in limitations in motion, increased pain or prolonged irritation.
- Do not place your surgical extremity in any extreme position for the first 4-6 weeks after surgery.
- Do not drive a car until you are off narcotic medication and are comfortable with the pedals.
FOLLOW-UP CLINIC VISITS
Your follow up visit should be scheduled. If uncertain of the date, please call your team to confirm. There is usually no charge for surgery related visits 90 days following surgery. You may receive a bill for any x-rays or special equipment such as a brace.